1. Introduction
1.1. Project Description and Scenario:
This guide targets small businesses, freelancers, and technical consultants seeking a cost-effective method to integrate their existing WhatsApp communication histories into their SuiteCRM system. Imagine a sales representative or consultant who has maintained critical business relationships and agreements via their private or business WhatsApp number over months or years. These valuable data exist only on the smartphone and are disconnected from the company’s central CRM system.
This comprehensive technical guide walks you through extracting, decrypting, and migrating a complete WhatsApp chat history from an Android smartphone into a self-hosted SuiteCRM 8 instance. The goal is to create a permanent, searchable, and contextually complete communication history linked directly to contact data in the CRM.
1.2. Comparison with Commercial WhatsApp Integrations:
- Technical Difference: Commercial integrations use the official, paid WhatsApp Business API, enabling real-time message synchronization directly from the CRM. However, they often do not guarantee the full migration of historical data (messages + media) to the extent described here; their focus is typically on live communication. This method is an offline migration of existing WhatsApp data and does not support live communication from the CRM.
- Financial Aspect: Using the WhatsApp Business API incurs ongoing costs (often per message) in addition to integration partner fees. This method requires no recurring fees, leveraging free open-source tools, but demands technical expertise for the one-time setup.
1.3. Disclaimer and Recommendation:
The process described in this guide is technically demanding and involves potentially risky steps, such as uninstalling and reinstalling WhatsApp. Errors can lead to data loss.
IMPORTANT: Before starting this process, it is essential to create a complete manual backup of all your media files. Copy the entire /WhatsApp/Media folder from your smartphone to a secure location on your PC.
For a professional, guaranteed, and secure execution of this process, we recommend engaging the services of a specialized IT consultant. ETHEROPS AI offers expertise in implementing such complex data integration projects.
2. System Environment and Tools
2.1. Server & Application Environment:
- CRM System: SuiteCRM Version 8.8.0
- Hosting Technology: Docker with Docker-Compose
- Container Images:
bitnami/suitecrm:latest,bitnami/mariadb:latest - Host Operating System: Windows
2.2. Required Software & Tools:
3. Initial Setup of the Docker Environment
3.1. Install Docker Desktop
Download Docker Desktop from the official website, install it, and ensure it is running.
3.2. Create Project Directory
Create the following main directory for the project on your PC: C:\Suitecrm.
3.3. Create docker-compose.yml File
Create a new text file in C:\Suitecrm named docker-compose.yml. Insert the following content exactly as shown. Replace the placeholders [YOUR_DB_USER], [YOUR_DB_PASSWORD], and [YOUR_CRM_PASSWORD] with your own secure values.
version: '2'
services:
  mariadb:
    image: 'bitnami/mariadb:latest'
    environment:
      - MARIADB_USER=[YOUR_DB_USER]
      - MARIADB_DATABASE=suitecrm
      - MARIADB_PASSWORD=[YOUR_DB_PASSWORD]
      - MARIADB_ROOT_PASSWORD=[YOUR_DB_PASSWORD]
    volumes:
      - 'mariadb_data:/bitnami/mariadb'
  suitecrm:
    image: 'bitnami/suitecrm:latest'
    environment:
      - SUITECRM_DATABASE_HOST=mariadb
      - SUITECRM_DATABASE_PORT_NUMBER=3306
      - SUITECRM_DATABASE_USER=[YOUR_DB_USER]
      - SUITECRM_DATABASE_PASSWORD=[YOUR_DB_PASSWORD]
      - SUITECRM_DATABASE_NAME=suitecrm
      - SUITECRM_USERNAME=[YOUR_DB_USER]
      - SUITECRM_PASSWORD=[YOUR_CRM_PASSWORD]
    ports:
      - '8080:8080'
      - '8443:8443'
    volumes:
      - 'suitecrm_data:/bitnami/suitecrm'
      - './Media:/bitnami/suitecrm/public/whatsapp_media'
    depends_on:
      - mariadb
volumes:
  mariadb_data:
    driver: local
  suitecrm_data:
    driver: local
3.4. Start Containers
Open a PowerShell in your project directory (C:\Suitecrm) and run the following command:
docker-compose up -dWait a few minutes until the containers are fully started. You can monitor the progress with docker-compose logs -f. Your SuiteCRM instance is now accessible at http://localhost:8080.
4. Data Extraction and Decryption
4.1. Manual Media Backup
Connect your Android smartphone to your PC. Copy the entire /Android/media/com.whatsapp/WhatsApp/Media folder from the phone to your project directory C:\Suitecrm\Media.
4.2. Create Synchronized WhatsApp Backup & Key
- In WhatsApp, create a fresh, end-to-end encrypted backup on Google Drive and generate a new 64-character key. Save this key securely in an external location.
- Uninstall WhatsApp. In the uninstallation dialog, keep the option "Keep app data" checked.
- Reinstall WhatsApp from the Play Store. The app will detect the remaining data on the phone and automatically restore the chat history.
- After restoration, restart the smartphone.
4.3. Copy Database
Copy the new database file (e.g., msgstore.db.crypt15) from the directory /Android/media/com.whatsapp/WhatsApp/Databases/ to your PC in the project directory C:\Suitecrm.
4.4. Securely Decrypt Database
- Open the decryption tool link: Google Colab Decryptor
- Click "Copy to Google Drive".
- Run the copied notebook in your Google Drive: Upload the
.crypt15file, enter the 64-character key saved in step 4.2, and perform the decryption. - Download the decrypted
msgstore.dbfile and save it inC:\Suitecrm.
5. SuiteCRM Configuration
5.1. Create Custom "WhatsApp" Module
- Log in to SuiteCRM with the user created during the Docker installation.
- Navigate to Admin -> Module Builder -> New Module.
- Fill in the module information:
- Package Name: `WhatsAppPackage`
- Module Name: `WhatsApp`
- Type: `Basic`
- Add Fields: Create the following new fields:
- Field 1:
- Data Type: `TextArea`
- Field Name: `message_body`
- Rows: `10`
- Columns: `60`
- Field 2:
- Data Type: `DropDown`
- Field Name: `direction`
- Dropdown List: Create a new list named `whatsapp_direction_list` with the values `Sent` and `Received`.
- Field 3:
- Data Type: `Datetime`
- Field Name: `message_timestamp`
- Field 1:
- Click "Deploy Package".
5.2. Establish Relationship with Contacts
- Navigate to Admin -> Studio -> Contacts -> Relationships.
- Click "Add Relationship".
- Define the relationship:
- Relationship Type: `One-to-Many`
- Related Module: `WhatsApp`
- Click "Save & Deploy".
5.3. Create URL Field for Chat Link
- Navigate to Admin -> Studio -> Contacts -> Fields.
- Click "Add Field".
- Configure the field:
- Data Type: `URL`
- Field Name: `whatsapp_verlauf`
- Leave all other settings empty.
- Go to Admin -> Studio -> Contacts -> Layouts -> Detail View, drag the new field into the layout, and click "Save & Deploy".
- Finally, perform a "Quick Repair and Rebuild" under Admin -> Repair.
6. Data Workflow (SQL and Import)
6.1. Contact Data Workflow
- Export Contacts from Smartphone:
- Open the "Contacts" app on your Android smartphone.
- Tap the menu (often `☰` or three dots).
- Select "Manage Contacts" > "Import/Export" > "Export".
- Choose a storage location (e.g., internal storage) and confirm the export. The contacts will be saved as a
.vcffile.
- Convert
.vcfFile to a Structured.csvFile:- Open Google Contacts (contacts.google.com) with a Google account that has no existing contacts to avoid data mixing.
- Click "Import" on the left, select "Choose File," and upload the
.vcffile you just created. - After successful import, click "Export" on the left.
- Select "Google CSV" as the export format and export the file. You will receive a
contacts.csvfile.
- Import Contacts into SQLite: Import the
contacts.csvfile into DB Browser for SQLite as a new table named `Contacts`. - Clean Data (Ensure Mandatory Fields): Run the following SQL query in DB Browser for SQLite to ensure the `Last Name` field, required for CRM import, is not empty:
UPDATE Contacts SET "Last Name" = "First Name" WHERE "Last Name" IS NULL OR "Last Name" = ''; - Export Cleaned Contacts: Export the updated `Contacts` table from DB Browser for SQLite as
contacts_cleaned_for_crm.csv. - Import Contacts into CRM: Import the
contacts_cleaned_for_crm.csvfile into the `Contacts` module in SuiteCRM. - Export Contacts with IDs: Immediately export all imported contacts from SuiteCRM again. The resulting file now includes the `ID` column, crucial for linking.
- Prepare Final Contact Table in SQLite:
- Delete the existing `Contacts` table in DB Browser for SQLite.
- Import the `Contacts-with-IDs` CSV file as a new table named `Contacts`.
6.2. Chat History Workflow
- Create Unified View in SQLite:
What & Why: This step creates a virtual table (`View`) in the SQLite database. This view is a "master list" of the entire chat history. It searches the database for all text messages and media events (images, voice messages, etc.) and combines them into a single, chronologically sorted list, noting whether each entry is text or media.
How: Run the following SQL query in DB Browser for SQLite:
DROP VIEW IF EXISTS v_Ganzheitlicher_Export; CREATE VIEW v_Ganzheitlicher_Export AS SELECT m.timestamp, 'Text' AS message_type, m.text_data AS content, m.from_me, c.jid_row_id FROM message AS m JOIN chat AS c ON m.chat_row_id = c._id WHERE m.text_data IS NOT NULL AND m.text_data != '' UNION ALL SELECT m.timestamp, 'Media' AS message_type, mm.file_path AS content, m.from_me, c.jid_row_id FROM message AS m JOIN chat AS c ON m.chat_row_id = c._id JOIN message_media AS mm ON m._id = mm.message_row_id WHERE mm.file_path IS NOT NULL AND mm.file_path != ''; - Create Cleaned Contact Data Table:
What & Why: This intermediate step creates a new, clean table with contact data. It addresses the issue that phone numbers in the CRM export are often poorly formatted (with spaces, `+`, etc.) and sometimes contain multiple numbers in one field. This query extracts only the first, fully cleaned number per contact, enabling fast and reliable linking with chat data.
How: Run the following SQL query:
DROP TABLE IF EXISTS Contacts_Clean; CREATE TABLE contacts_clean AS SELECT *, CASE WHEN SUBSTR(REPLACE(REPLACE(REPLACE(REPLACE( CASE WHEN INSTR("Mobile", ' :::') > 0 THEN SUBSTR("Mobile", 1, INSTR("Mobile", ' :::') - 1) ELSE "Mobile" END, ' ', ''), '-', ''), '+', ''), "'", ''), 1, 1) = '0' THEN '49' || SUBSTR(REPLACE(REPLACE(REPLACE(REPLACE( CASE WHEN INSTR("Mobile", ' :::') > 0 THEN SUBSTR("Mobile", 1, INSTR("Mobile", ' :::') - 1) ELSE "Mobile" END, ' ', ''), '-', ''), '+', ''), "'", ''), 2) ELSE REPLACE(REPLACE(REPLACE(REPLACE( CASE WHEN INSTR("Mobile", ' :::') > 0 THEN SUBSTR("Mobile", 1, INSTR("Mobile", ' :::') - 1) ELSE "Mobile" END, ' ', ''), '-', ''), '+', ''), "'", '') END AS clean_mobile FROM Contacts; - Create Final Export View in SQLite:
What & Why: This step creates the final virtual table for export. It takes the "master list" of chats, links it with the cleaned contact table, and formats all data exactly as required by the SuiteCRM import wizard.
How: Run the following SQL query:
DROP VIEW IF EXISTS v_Finaler_Massenimport; CREATE VIEW v_Finaler_Massenimport AS SELECT 'WhatsApp (' || CASE g.from_me WHEN 1 THEN 'Sent' ELSE 'Received' END || ') ' || CASE g.message_type WHEN 'Media' THEN 'File' ELSE 'Message' END || ' on ' || strftime('%Y-%m-%d %H:%M', g.timestamp / 1000, 'unixepoch', 'localtime') AS name, REPLACE(REPLACE(g.content, CHAR(10), ' '), '"', '""') AS message_body, CASE g.from_me WHEN 1 THEN 'Sent' ELSE 'Received' END AS direction, strftime('%Y-%m-%d %H:%M', g.timestamp / 1000, 'unixepoch', 'localtime') AS message_timestamp, crm.id AS contact_id_c, '1' AS assigned_user_id FROM v_Ganzheitlicher_Export AS g JOIN jid AS j ON g.jid_row_id = j._id JOIN Contacts_Clean AS crm ON j.raw_string = crm.clean_mobile || '@s.whatsapp.net'; - Prepare Data for Import:
- In DB Browser for SQLite, go to File -> Export -> Table(s) as CSV file....
- Select the
v_Finaler_Massenimportview. - Uncheck the "Column names in first row" option.
- Ensure the Field Separator is a comma (`,`) and the String Delimiter is a double quote (`"`).
- Save the file.
- Perform Bulk Import in SuiteCRM:
- Navigate to the "WhatsApp" module and select the import option from the "Actions" menu.
- Upload the headerless CSV file created above.
- In Step 2: Confirm Import File Properties, disable the Header Row checkbox and ensure the properties are correctly recognized.
- In Step 3: Confirm Field Mappings, manually map the columns: Column 1 -> `Name`, Column 2 -> `Message` (`message_body`), Column 3 -> `Direction`, Column 4 -> `Timestamp`, Column 5 -> `Contacts ID`, Column 6 -> `Assigned User Id`.
- Complete the import.
7. External Chat View and Final Linking
7.1. Identify Table Names for Chat View
- What & Why: Before creating the PHP file for the chat view, you need to know the exact table names SuiteCRM created for the "WhatsApp" module. These names are critical for the PHP script to query the correct data from the CRM database.
- How: Run the following commands in a PowerShell, replacing `[YOUR_DB_USER]` with your database username:
docker-compose exec mariadb mysql -u [YOUR_DB_USER] -p suitecrmEnter your password and execute this SQL command:
SHOW TABLES;Note the following two names for later use in the PHP script:
- The name of your module (e.g., `whatsapppackage_whatsapp`) as `YOUR_MODULE_TABLE_NAME`.
- The name of the relationship table (e.g., `contacts_whatsapppackage_whatsapp_1_c`) as `YOUR_RELATIONSHIP_TABLE`.
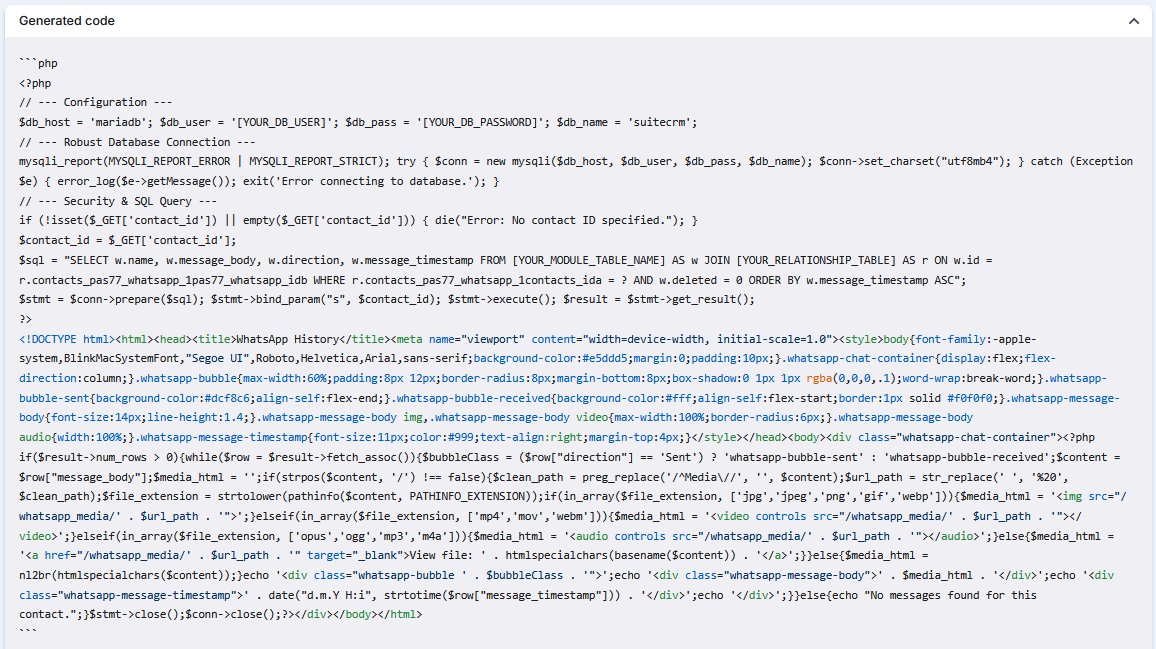
7.2. Create PHP File whatsapp_chat_view.php
- What & Why: This step creates the webpage that displays the chat history. The code includes the database connection, data query logic, and HTML/CSS for a visual chat-bubble presentation.
- How: Create a PHP file on your PC with the content shown in the image below. Replace the placeholders like
[YOUR_DB_USER]with the values you identified earlier.
7.3. Copy File to Container
docker cp whatsapp_chat_view.php suitecrm-suitecrm-1:/bitnami/suitecrm/public/
docker-compose exec suitecrm chown daemon:daemon /bitnami/suitecrm/public/whatsapp_chat_view.php
7.4. Update Import for Links
- Create an Update View in SQLite:
DROP VIEW IF EXISTS v_Url_Update_Data; CREATE VIEW v_Url_Update_Data AS SELECT id, "Last Name" AS last_name, 'http://localhost:8080/whatsapp_chat_view.php?contact_id=' || id AS whatsapp_verlauf FROM Contacts; - Export the
v_Url_Update_DataView as a CSV file, keeping the header row. - Import this CSV file into the Contacts module, selecting the "Update existing records" option. In Step 3, map the `id` and `whatsapp_verlauf` fields.